 Let's say you've got a great idea for a new Coldbox or CommandBox module. You've spent hours writing and testing the code, you're proud of your efforts, and now it's time to introduce it to the greater CFML community!
In its early stages, shipping your new module isn't such a big deal. The .zip link provided by GitHub works fine for the Forgebox link, and it's not a big deal to update the entry whenever you release a new version. Once you release it and other developers actually start using and depending on your software, however, the need to automate aspects of the build and deployment process become apparent.
Meet Travis CI (If you're not already acquainted), your new, inexpensive (free for open source!) friend for building, testing, and deploying your module. In this entry, we'll walk you through the steps to set up Travis CI integration with your project, which will allow you to spend your free development time on adding features and fixing bugs, rather than on packaging and deployment.
In this example we'll use the CBMongoDB module, which uses Travis to build and test new branch pushes and pull requests. Head on over to GitHub to check out the source and view the .travis-ci.yml file, which is where all of the instructions reside.

First things first, head on over to travis-ci.org and create an account. Sign in using your GitHub account and, once your signup is complete, you'll see a list of all your repos, which may be switched on if you wish to use Travis builds.
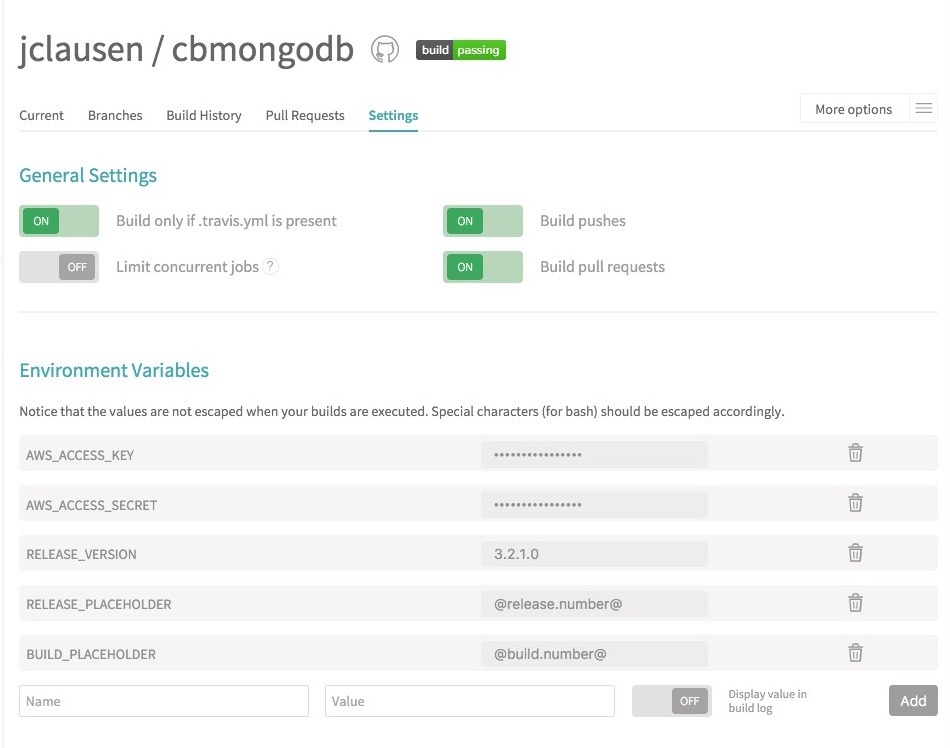
Switch on your module's repo and configure the settings. You'll notice there are also additional environment variables, where you can add secret keys. In the case of CBMongoDB, builds are published to an AWS S3 bucket so I have the variables AWS_ACCESS_KEY and AWS_ACCESS_SECRET set for authentication during the build process.
Now it's time to configure your project. Open it up in your favorite IDE and create the file .travis-ci.yml (On a separate note, if you use GitLab, the .gitlab-cy.yml used there is nearly 100 interchangeable with the Travis file, so you can use the majority of these instructions for private repos hosted on GitLab).
Now it's time to configure your build steps in your YAML file. First, we need to add our language, and OS information. Travis has Docker container support, so if you'd like to configure your build to run on a separate OS, you can use those instructions. For our purposes, builds on the default OS of Ubuntu is fine.
1 2 3 |
language: javasudo: requireddist: trusty |
In this case, we've specified builds to use Ubuntu Trusty, which I found mitigated some build errors caused on Travis' old Precise build system.
Next add your installation steps which, for this module, include adding the repos for CommandBox and MongoDB in the "before_install" step and then install them once the repos are available. Because Travis' current version of Mongo for builds is 2.6, we needed to use a custom install of MongoDB, to ensure full forward compatibility. If your projects rely on DBMS support, additional documentation is available for configuring your build file.
1 2 3 4 5 6 7 8 9 10 11 12 13 |
before_install: - sudo apt-key adv --keyserver keys.gnupg.net --recv 6DA70622 - sudo echo "deb http://downloads.ortussolutions.com/debs/noarch /" | sudo tee -a /etc/apt/sources.list.d/commandbox.list - sudo apt-key adv --keyserver hkp://keyserver.ubuntu.com:80 --recv EA312927 - sudo echo "deb http://repo.mongodb.org/apt/ubuntu trusty/mongodb-org/3.2 multiverse" | sudo tee -a /etc/apt/sources.list.d/mongodb-org-3.2.listinstall: # MongoDB Manual Install - sudo apt-get update && sudo apt-get --assume-yes install mongodb-org zip unzip commandbox - mongo --version #Commandbox setup - box install - box server start port=49616 rewritesEnable=false openBrowser=false |
Note that we've hard-coded the CommandBox server port in our build file. You may omit this if the variables are specified in the root box.json file for your project.
The next three steps configured in the build file prepare, test, and set the versions information in the module's box.json file.
First use curl to hit the root URL of the project to make sure ColdBox has been loaded:
1 2 |
before_script: - curl http://localhost:49616/ |
Now run our tests. Note that I'm testing the output of TestBox's command runner using GREP. If TestBox's output contains any test failure quantity greater than 0 or html, denoting a Lucee error, an exit code of 1 is delivered and the build is aborted.
1 2 3 4 |
script: > testResults="echo $(box testbox run)"; echo "$testResults"; if grep -i "\[Failures: [1-9][0-9]\?\]\|<t[^>]*>\|<b[^>]*>" <<< $testResults; then exit 1; fi |
Note: the ">" character after the "script:" declaration saves us from having to do some additional quoting of variables.
Assuming that our test passed, we can now set our version information in our box.json file. You'll note two sleeps are added to prevent concurrent reading or writing of the file, as sometimes the bash command exits before the writing of the file is complete.
1 2 3 4 5 |
after_success: - sudo sed -i "s/$RELEASE_PLACEHOLDER/${Setting: RELEASE_VERSION not found}/g;" 'modules/cbmongodb/box.json' - sleep 2 - sudo sed -i "s/$BUILD_PLACEHOLDER/${Setting: TRAVIS_BUILD_NUMBER not found}/g" 'modules/cbmongodb/box.json' - sleep 2 |
Once the version information is set, we'll .zip up the appropriate directories and prepare to send them off to S3:
1 2 3 4 5 |
before_deploy: - mkdir deploy - cp README.md modules/cbmongodb/ && cp LICENSE modules/cbmongodb - cd modules/cbmongodb && sudo zip -r "../../deploy/cbmongodb-$TRAVIS_BRANCH-v$RELEASE_VERSION+$TRAVIS_BUILD_NUMBER.zip" ./* && cd ../../ - cp "deploy/cbmongodb-$TRAVIS_BRANCH-v$RELEASE_VERSION+$TRAVIS_BUILD_NUMBER.zip" "deploy/cbmongodb-$TRAVIS_BRANCH-latest.zip" |
Lastly, Travis has built-in support for DPL deployments, with options to use a a variety of providers. In our case, we simply use the S3 Provider, and set the configuration options, using the variables for our secrets set earlier in the project settings:
1 2 3 4 5 6 7 8 9 10 |
deploy: skip_cleanup: true provider: s3 #AWS Credentials need to be set in Travis access_key_id: $AWS_ACCESS_KEY secret_access_key: $AWS_ACCESS_SECRET bucket: "oss.silowebworks.com" local-dir: deploy acl: public_read all_branches: true |
That's it! Once a commit is pushed to one of the project branches, and it passes all of its tests, the latest version is sent up to S3, where the CommandBox command, box install cbmongodb , will install it "automagically"!
As for yourself, you can focus more time on writing great software! You'll find that one of your new joys in life will be the result of successful build and deployment:


Add Your Comment
(3)
Mar 28, 2016 11:29:09 UTC
by Grant Copley
Thanks Jon. This helped me a bunch and not just w/ my ColdBox apps.
Mar 28, 2016 11:44:54 UTC
by Grant Copley
I do see one downside to using this method though. Since you can't specify which Lucee engine is used when running 'box server start', your tests will run against the current version of Lucee that CommandBox uses.
Mar 28, 2016 12:03:14 UTC
by Luis Majano
Thanks Grant! Yes that is correct. We currently are working on supporting multi-engine support in CommandBox. For now, you could use the cfml-ci project as well with this approach: https://github.com/coldfumonkeh/cfml-ci